RPi Booting over Network
Boot me up, Scotty!
Table of Contents
Overview
Here’s an overview of the setup made for booting a Raspberry Pi over network. Goal was to achieve boot using boot partition and root partition from a development machine, in order to speed up test process for trying out subsequent Buildroot stuff, as well as the modifications on the Raspbian image.
Aim here was to have a successful boot, and be able to SSH to the RPi.
HW/SW Setup Outline
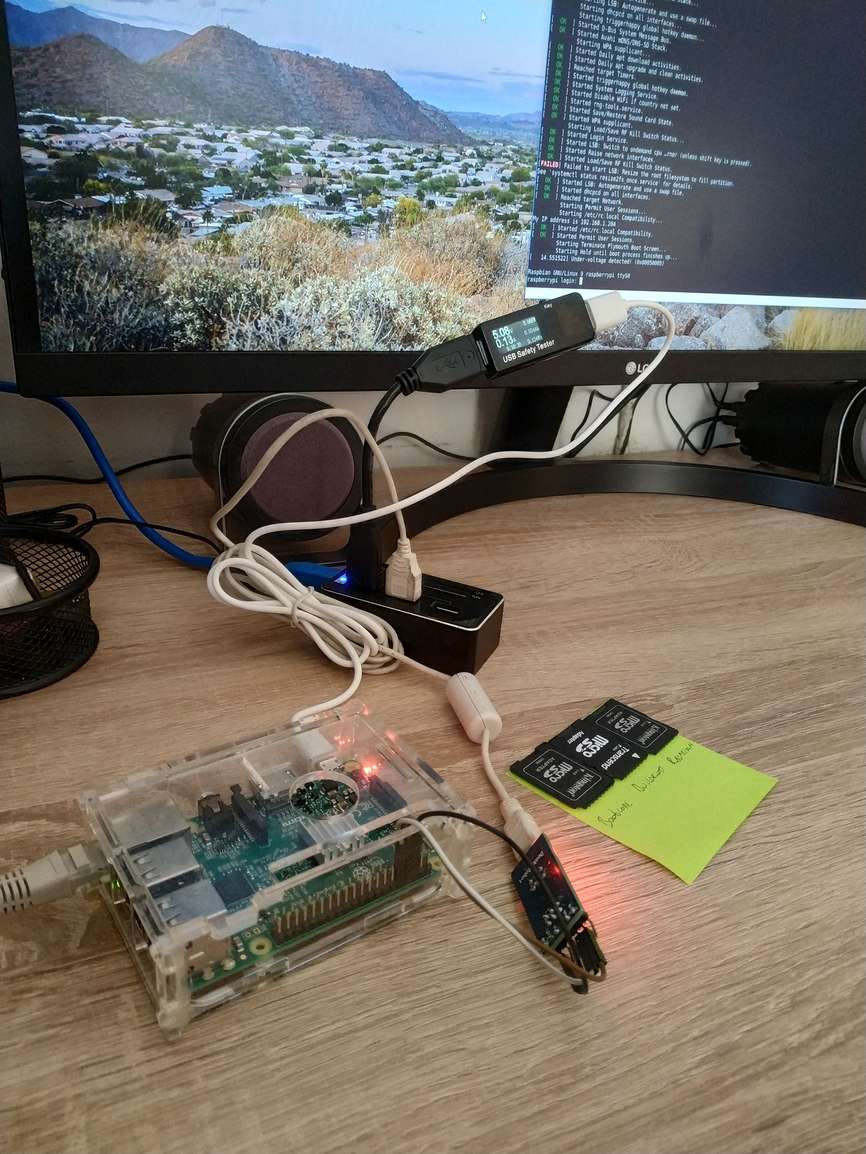
- Have a Raspberry Pi connected over ETH directly to the PC running Windows.
- Have a VirtualBox virtual machine running a Linux distro with TFTP/NFS servers brought up.
- Connect to the RPi serial port with serial to USB adapter to monitor the boot process.
- For powering up RPi, use USB power meter to monitor the state of the device.
Here’s the photo of the hardware setup -
Concrete Versions
| Item | Value |
|---|---|
| Host OS | Windows 10 |
| Guest OS | Xubuntu 18.04.2 LTS |
| RPi | Raspberry Pi Model 3B |
| Virtualization software | VirtualBox 6.0.8 |
| RPi image | Raspbian Stretch lite |
Network Setup
The idea is to have 3 devices on the same network -
| Device | Note | Address |
|---|---|---|
| Host OS | Provides a network adapter | Dynamic |
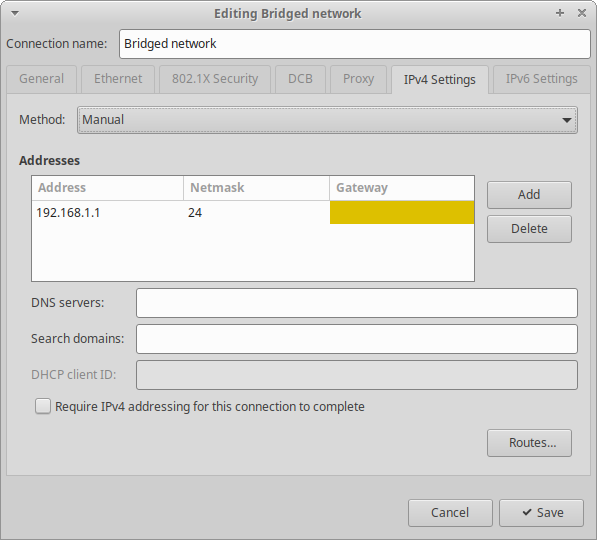
| Guest OS | Taps to host OS network adapter | 192.168.1.1/24 |
| RPi | Connected over ETH to host adapter | Dynamic |
Dynamic addresses will be provided by the guest OS DHCP server.
Served Directories
Directories served by the servers in the guest OS are -
| Server | Served dir |
|---|---|
| TFTP | /tftpboot |
| NFS | /nfs/rpi |
Setup Procedure
Here is the overview of steps I did to bring up RPi to life over network. Notes on particular steps are given below.
- I’ve used set up the VM, and installed fresh installation of Xubuntu, to make sure older modifications didn’t mess up with performing the necessary configuration steps.
- Then, went through the setup steps for the servers as on the guide page mostly as they are written there.
- After that I’ve deployed and configured the image partitions also per information from the guide page.
- Did RPi preparation also per info from the guide page. Important note on the use of SD card in the corresponding chapter below.
- Cross fingers, and boot.
VM Setup
Network adapter is attached to a bridged adapter, “Allow All” promiscuous mode.
Guest OS Setup
Network Adapter Setup
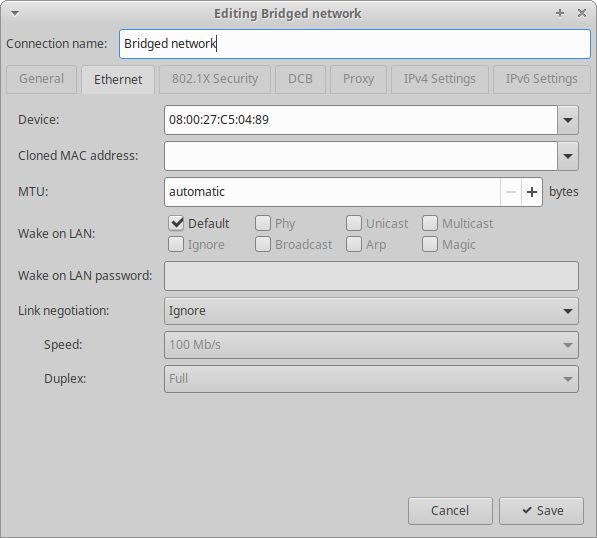
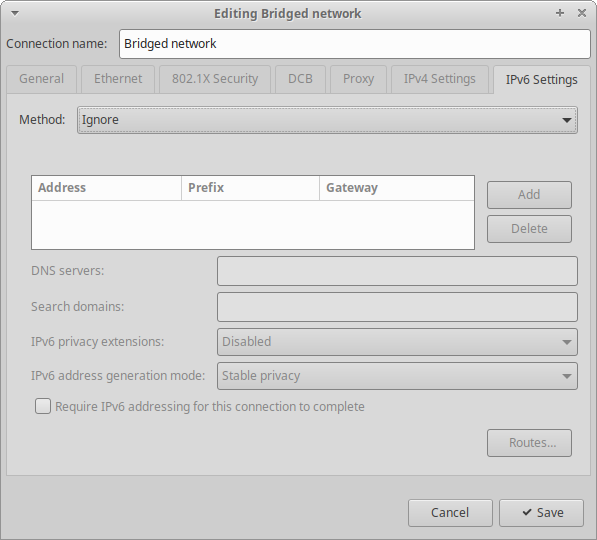
I’ve configured the VM guest network adapter through Xubuntu’s
nm-connection-editor. Here are the screenshots -
Netplan
Alternatively, netplan (netplan.io package) can be used to configure
the network adapter for us.
The sample netplan file is given here. Take note of the interface name, it may have to be updated.
It should be placed in /etc/netplan. Then, netplan should be updated -
$ sudo netplan apply
NFS Server
Here’s the content of the exports file -
marko@marko-VirtualBox:/$ cat /etc/exports
/nfs/rpi 192.168.1.0/24(rw,sync,no_subtree_check,no_root_squash)
And a check if it is mounted properly -
marko@marko-VirtualBox:/$ showmount -e 192.168.1.1
Export list for 192.168.1.1:
/nfs/rpi 192.168.0.0/24
Dnsmasq
The only uncommented part of /etc/dnsmasq.conf is -
listen-address=192.168.1.1
port=0
dhcp-range=192.168.1.100,192.168.1.250,12h
log-dhcp
enable-tftp
tftp-root=/tftpboot
pxe-service=0,"Raspberry Pi Boot"
Serial Port
Picocom is used for serial console -
$ sudo apt install picocom
$ sudo usermod -a -G dialout $(whoami)
Deploying Image Partitions
Populating TFTP/NFS Mounted Directories
Important difference here is that I’ve transferred the files from the image by mounting it inside the VM as a read-only, and then cp-ing, or rsync-ing the files from its partitions to the TFTP/NFS mounting directories.
For this, I’ve copied it first to the VM, then mounted it. Otherwise, when mounted from the VM shared folder, file transfer was slow as hell, and also unreliable (rsync had a tendency to freeze).
Here’s the overview of commands to mount them -
$ sudo mount -t auto -o offset=50331648,ro ~/temp/2019-04-08-raspbian-stretch-lite.img /mnt/rpi/rfs
$ sudo mount -t auto -o offset=4194304,ro ~/temp/2019-04-08-raspbian-stretch-lite.img /mnt/rpi/boot
Configuring Image
Changes made to the files are -
/tftpboot/config.txt- Appended it withenable_uart=1, to get the UART available./tftpboot/cmdline.txt- Updated NFS address to192.168.1.1.- Skipped SSH keys regeneration.
- Also, don’t forget editing of
/nfs/rpi/etc/fstab!
RPi Preparation
Had to set the OTP register 17 bit 29 to enable USB host booting. Did that with the RPi image from a SD card. Useful info on the OTP found on this RPi page, and info about the overall boot process here.
After that, formatted card to one FAT32 partition, and copied
bootcode.bin from boot partition onto it. Otherwise, booting would
succeed like one in 10 times, if at all. More info in issues section.
Running RPi with Network Boot
Useful tools for tracking the boot process are:
# tcpdump -i <network-interface>- Check for BOOTP request.# journalctl -f -u dnsmasq.service- Check if files are TFTP-ed successfully.$ picocom -b 115200 /dev/ttyUSB0- Track overall boot process, esp. useful for NFS issues.
With RPi successfully booted, I was able to login over serial console. After that, remaining step was to start SSH server, and check for the given IP address -
$ sudo systemctl enable ssh.service
$ sudo systemctl start ssh.service
$ ip a show eth0
Then, all that was left was to SSH to the RPi, prod the home directory and check if the changes appear in the served NFS directory on the guest OS.
Issues
Overall, network booting RPi seems like a tricky issue. Network booting page states that -
There are a number of known problems with the Ethernet boot mode. Since the implementation of the boot modes is in the chip itself, there are no workarounds other than to use an SD card with just the bootcode.bin file.
Particular issue where this workaround helps has been encountered, and addressed below.
RPi not Sending BOOTP Request
This issue appears when trying to boot RPi without a SD card. It is
visible when using tcpdump. Here’s the snippet what is sniffed from
the network in this case -
marko@marko-VirtualBox:/tftpboot$ sudo tcpdump -i enp0s8 port bootpc
tcpdump: verbose output suppressed, use -v or -vv for full protocol decode
listening on enp0s8, link-type EN10MB (Ethernet), capture size 262144 bytes
19:24:49.960758 IP 0.0.0.0.bootpc > 255.255.255.255.bootps: BOOTP/DHCP, Request from bc:ee:7b:9d:ab:ce (oui Unknown), length 322
19:24:49.964926 IP marko-VirtualBox.bootps > 192.168.1.221.bootpc: BOOTP/DHCP, Reply, length 306
The single BOOTP is from the host OS network adapter.
Here’s how it should look like -
marko@marko-VirtualBox:/tftpboot$ sudo tcpdump -i enp0s8 port bootpc
tcpdump: verbose output suppressed, use -v or -vv for full protocol decode
listening on enp0s8, link-type EN10MB (Ethernet), capture size 262144 bytes
19:25:52.123745 IP 0.0.0.0.bootpc > 255.255.255.255.bootps: BOOTP/DHCP, Request from bc:ee:7b:9d:ab:ce (oui Unknown), length 322
19:25:52.132651 IP marko-VirtualBox.bootps > 192.168.1.221.bootpc: BOOTP/DHCP, Reply, length 306
19:25:52.979730 IP 0.0.0.0.bootpc > 255.255.255.255.bootps: BOOTP/DHCP, Request from b8:27:eb:49:f5:8c (oui Unknown), length 322
19:25:52.981865 IP marko-VirtualBox.bootps > 192.168.1.204.bootpc: BOOTP/DHCP, Reply, length 350
The solution is to boot it with an SD card with one FAT32 partition, and
bootcode.bin from boot partition onto it. Other possible solution is
to increase dhcp-reply-delay option in the dnsmasq config file, but
that did not help me out, tried 1s and 3s delay.
Useful info on the issue can be found in this forum post.
Buster Image Boot Freeze
At a time of this check new Raspbian image appeared -
2019-06-20-raspbian-buster-lite.img. Trying it out resulted in a
frozen boot some time after mounting NFS root. Here’s the forum
discussion on that topic.
Resources
- netboot : Network booting info - Bootloader process, issues.
- nettut : Setting up network booting for RPi server - booted RPi setup.
- bootflow : Description of the bootloader execution, and use of OTP bits.
- rpi-boot : RPi boot process in general.
- bootcode : BOOTP missing issue discussion.
- rpi-dl : Download page for Raspbian images.
- buster-boot-fail : Raspbian Buster freeze issue discussion.
- otpbits : OTP bits description.
- netplan-config : Guide to setting netplan.
- netplan-examples : Netplan examples.